
Pruning
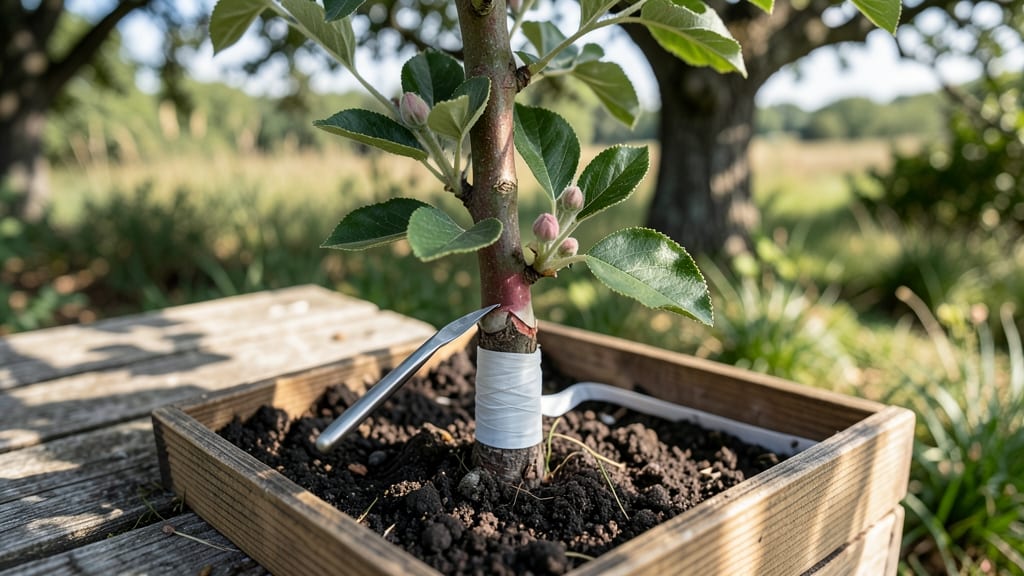
Grafting a tree isn’t just a skill—it’s a way to combine the best traits of two plants into one stronger, more productive specimen. 🌳 I’ll never forget the first time I watched a scion I’d carefully attached take root and grow into a thriving branch, proving that even a beginner can master this ancient technique.
The key to success lies in the right tools—a sharp grafting knife, rooting hormone, and clean rubber bands—and choosing the right time, like late winter when trees are dormant but not frozen. We’ll focus on the whip-and-tongue method, perfect for beginners, because it’s forgiving yet produces reliable unions.
Once you see those calluses form and the graft start to heal, you’ll understand why gardeners have relied on this method for centuries.
What you’ll end up with is a tree that grows faster, resists disease better, and produces fruit or flowers earlier than it would on its own roots.
Imagine your peach tree bearing fruit in just two years instead of five, or your apple tree combining the flavor of a rare heirloom with the hardiness of a local rootstock. The satisfaction of watching a grafted branch thrive is unmatched.
Whether you’re reviving a dying tree, propagating rare varieties, or just experimenting with different fruit flavors, grafting opens up possibilities you’d never get from seeds alone. Let’s get started with the tools and steps that make this process foolproof—even for those of us who’ve struggled with pruning before.
📚 In This Guide
- What you need
- Instructions
- Tips and common mistakes
- Wrapping up and next steps
What you need
- ● Scissors or grafting knife – A sharp, clean knife (or pruning shears) with a blade at least 3–4 inches long for precise cuts.
- ● Grafting tape or rubber bands – 1–2 rolls (1/4-inch wide) to secure the graft union tightly.
- ○ Pruning sealant (optional but helpful) – A small bottle of wound paint or tree sealant to prevent disease.
- ● Rootstock and scion wood – Rootstock: A healthy, disease-free tree (or cutting) with compatible root systems.
- ● Scion: A young shoot (about pencil-thick, 4–6 inches long) from the tree you want to propagate.
- ○ Grafting wax (optional) – A small container to seal the cut surfaces and reduce moisture loss.
- ○ Grafting clips or splints (optional) – For extra support, especially for whip-and-tongue grafts.
- ● Timing: Graft in late winter or early spring (dormant season) for best success.
- ● Clean workspace: Disinfect tools with rubbing alcohol to avoid bacterial infections.
- ● Weather check: Choose a cloudy, cool day to reduce stress on the tree.
- ● Compatibility: Ensure the rootstock and scion are from related species or cultivars for successful fusion.
Step-by-Step instructions for grafting trees like a pro
Here's the method I've used to successfully graft fruit trees and ornamentals—simple enough for beginners but precise enough for strong unions.
🪴 Step 1: Choose the Right Tools and Prepare Your Scions and Rootstock
Grafting requires sharp tools—use a clean, sharp grafting knife or razor blade to make clean cuts. Sterilize your tools with rubbing alcohol before starting. Select healthy 1/4-inch-thick scions (the shoot you'll graft) with at least 3-4 buds and a fresh, green rootstock (the established tree or root system).
I always choose scions from mature trees in late winter or early spring before new growth begins. The rootstock should be dormant but healthy, with smooth bark that's easy to work with. If the bark is rough or cracked, the graft may not take. For best results, match the thickness of your scion to the rootstock—1/4-inch scions work well with 1/2-inch rootstock.
✂️ Step 2: Make Precision Cuts for a Perfect Fit
Start by making a clean, slanted cut on the rootstock about 2-3 inches above the ground or where you want the graft to join. The cut should be 1-2 inches long and expose the cambium layer (the greenish layer just under the bark). This is where the scion and rootstock will bond.
Next, make a matching slanted cut on the bottom of your scion so it fits snugly against the rootstock. The angles should mirror each other—this ensures maximum contact between the cambium layers. Here's the thing—if the cuts don't align perfectly, the graft won't heal properly. Take your time to get it right.
🌱 Step 3: Join the Scion and Rootstock Securely
Slide the scion into the rootstock cut so the cambium layers align perfectly. For a whip-and-tongue graft (one of the simplest methods), make a small notch in the center of each cut before joining them. This interlocking fit ensures stability while the graft heals.
Wrap the graft tightly with rafting tape or plastic grafting tape, leaving the top bud exposed. Seal the entire graft with grafting wax or tree sealant to prevent drying and infection. The goal is to create a snug, airtight seal. If you see gaps or loose spots, add more tape or wax immediately—this is critical for success.
💧 Step 4: Protect and Monitor the Graft
Place the grafted tree in a shaded, humid environment for the first 2-3 weeks to reduce stress. Water lightly at the base—not enough to soak the graft site, but just enough to keep the soil moist. Overwatering now can rot the graft before it takes.
Watch for new growth from the scion within 4-6 weeks. If the graft is successful, you'll see fresh leaves emerging from the top bud. If the scion turns brown or wilts, it may have failed. Don't panic—sometimes grafts take longer, especially in cooler weather. Keep monitoring until you see clear signs of life.
☀️ Step 5: Gradually Acclimate and Care for the New Tree
Once the graft has taken root (usually after 6-8 weeks), gradually move the tree to more sunlight over 1-2 weeks. Start with morning sun only, then slowly increase exposure. This prevents shock and helps the tree adjust.
Prune any competing shoots from the rootstock below the graft line to redirect the tree's energy into growing through the scion. Fertilize lightly 3 months after grafting with a balanced, slow-release fertilizer. Avoid heavy feeding too soon—you want the tree to focus on healing, not producing fruit or leaves.
Tips & tricks for perfect tree grafting
Took me years to figure out these little tricks that make all the difference between a successful graft and one that fails. Here's what nobody tells you—
Tool Sharpness is Non-Negotiable: A dull knife will crush the cambium layer instead of cleanly slicing through it. Test your grafting knife by cutting through a piece of paper—if it drags, sharpen it. I keep a small whetstone in my toolkit just for this. In Step 2, when you're making those 1-2 inch cuts, a sharp blade ensures you expose the cambium cleanly, which is where the magic happens.
Scion Selection Secrets: While the instructions mention 3-4 buds, I look for scions with at least one extra bud as a backup. The top bud should be plump and green, not shriveled or brown. In late winter, I collect scions from trees that have already shown strong growth the previous season—they're more likely to thrive. For Step 1, if you're unsure about your scion's health, give it a gentle squeeze: it should feel firm, not mushy.
Wax Application Technique: The instructions mention sealing with grafting wax, but here's what I learned the hard way: apply the wax when it's still slightly warm (around 180°F) so it flows smoothly into any tiny gaps. I use a small brush to paint it on rather than just pressing a wax stick—this creates a better seal. In Step 3, after taping, I always do a final check for any exposed cambium that might need extra wax protection.
Humidity Hack: Creating that shaded, humid environment in Step 4 doesn't require fancy equipment. I simply place a clear plastic bag over the grafted area and secure it loosely with a rubber band. This maintains humidity without trapping too much moisture. Check the bag daily and remove it for a few hours if you see condensation forming inside—this prevents fungal growth while keeping the environment moist.
Pro Tips for Graft A Tree
- Took me years to figure out these little tricks that make all the difference between a successful graft and one that fails.
- Tool Sharpness is Non-Negotiable: A dull knife will crush the cambium layer instead of cleanly slicing through it.
- Scion Selection Secrets: While the instructions mention 3-4 buds, I look for scions with at least one extra bud as a backup.
Frequently asked questions
Got questions about grafting trees? You’re not alone—this technique can feel tricky at first! Below, we’ve rounded up the most common queries to help you feel confident before you start.
When is the best time to graft a tree?
The ideal window is late winter to early spring (just before buds swell) or mid-summer (when trees are actively growing). Avoid grafting during extreme cold or heat—dormant season (winter) is a no-go unless you’re using cold-hardy rootstocks like apple or pear. Timing ensures the tree’s energy isn’t drained by other processes.
What if my graft fails? How do I troubleshoot?
Failed grafts often stem from poor compatibility, dirty tools, or improper sealing. Check for callus formation (a bridge of tissue) at the junction—if it’s missing, the graft likely didn’t take. Common fixes:
- Re-graft using a different method (e.g., whip-and-tongue if cleft didn’t work).
- Ensure scion and rootstock are genetically compatible (e.g., apple scions on crabapple rootstock).
- Use grafting wax or tape to seal cuts and prevent dehydration.
Can I graft any tree, or are some better suited?
Not all trees play nice! Best candidates: fruit trees (apples, peaches), citrus, grapes, and some ornamentals (like roses). Avoid grafting: fast-growing trees (e.g., willows, poplars) or those with exudate-heavy sap (like maples)—they’re tough to work with. Always research your tree’s cambium layer (the growth layer) for success.
Is grafting cheaper than buying a new tree?
Yes—if you already have a healthy rootstock! Grafting costs $5–$20 per scion (plus tools), while a new tree can run $50–$200+. Pro tip: Propagate your own scions from cuttings or buy them from nurseries in bulk. Plus, grafting lets you combine traits (e.g., disease-resistant rootstock + sweet fruit scion) for a custom tree!
Do I need a greenhouse or special setup?
Not necessarily! A shady, humid spot (like a covered porch or under a tarp) works for most grafts. Key conditions:
- Keep humidity high (mist grafts daily or use a plastic bag).
- Avoid direct sun—it dries out cuts.
- Monitor for pests (e.g., ants or fungus) and treat early.
What’s the difference between grafting and budding?
Both join plant parts, but grafting uses a scion (stem + leaves) while budding uses just a single bud (often in T-budding). Grafting is faster (results in weeks) but riskier; budding is slower (takes months) but more precise for disease-resistant rootstocks. Choose grafting for quick growth or budding for long-term stability.
Wrapping up and next steps
Grafting a tree is a rewarding skill that can revitalize old wood, propagate rare varieties, or even save a struggling plant—and you’ve just learned how to do it with confidence! 🌱 By mastering the right techniques, timing, and tools, you’re not just growing a tree; you’re nurturing a legacy of strength and beauty.
Remember, patience and precision are your best friends here.
Ready to put your new skills to work? Start small with an easy-to-graft species like an apple or peach tree, and soon you’ll be creating your own orchard or restoring heirloom varieties. Happy grafting—and may your trees grow taller and healthier than ever! 🌳✨